Showing posts with label middle school. Show all posts

Friday, January 25, 2013

Mixed Media Printmaking

Long Ago by Kelly
...This piece makes me think of a  calm and cold evening in the desert.

In our elective class, we've been exploring printmaking. These are mixed media glue prints.  Hard pastel sticks, pastel pencils and markers were used  to add layers of interest to the work.  To see the original glue prints and the process click here.


Friday, January 18, 2013

Printmaking With Glue

 
Posted by Picasa


In the middle school elective class we've been exploring printmaking, specifically collographs.    The top two
images are pulled prints and the bottom image shows the actual inked plates.  This work is still in progress as we are using hard pastels to work into one selected print.  All of these images are the before, the un-worked print, next week I will post the results of the mixed media prints.

Process:
use glue to draw chosen image
let dry 24 hrs.
ink with brayers (we used speedball printing ink)
run through press
voila!

Tip: If you apply the glue thickly, it does give you a more substantial effect.  However, I encourage experimenting with the glue.  Drawing thin fluid lines, working the tip of the bottle into a field of glue to create interesting textures, adding sand to the glue or simply rubbing your finger across an area.  It's great to wonder what the effect will be once you pull your print.


Thursday, December 20, 2012

Collographs

 
Posted by Picasa


The collographs were made from corrugated and regular cardboard.  We cut the desired shapes and glued them onto a larger piece of cardboard.  We then sealed the surface with modpodge. After it was dry, we inked the board with a brayer and ran it through the press.  I'm sure it would work just as well to use the back of a wooden spoon to transfer the image though.  Given more time, I think it would be interesting to work into them with another medium like colored pencil. Nevertheless, they did a great job!

Wednesday, December 19, 2012

Plaster Masks

 
Posted by Picasa

We've finished the masks!  They were constructed using plaster gauze, tag/thin cardboard, paint, hot glue and random collage items.
To see the the process click on video below


Plaster Gauze Mask Making from Gabriela Elizalde on Vimeo.

Friday, November 9, 2012

Line Printing + Color

 
Posted by Picasa


Looking closely at the artwork above you'll notice the images are all created with straight lines. Printing with a cardboard tool is always a fun challenge.  The simplicity is what makes it so open to diversity. It's wonderfully open-ended as the student may begin with a particular idea and it develops into another or the student may have no idea in mind and just start printing to find their mind making connections to create an image.   
Other variations of this idea and the process can be seen  here.

Friday, October 26, 2012

Assemblage With Old Watercolor Sets

This was a wonderfully challenging project; you could actually see the thinking going on.


The Ever-Changing
by Reese

My assemblage is about a person's journey through life.  Sometimes we are struggling, sometimes we feel like we have the world in our hands, at other times maybe we are just at peace.  The silver piece represents how there is always hope and dreams in us. 
Esmae 


My assemblage is about being lost in the moment of doing something you love. 
Gabriel 
Posted by Picasa


We've used old watercolor sets for the base of our assemblages. The materials were simple in nature but could be transformed depending on the artistry each student brought to the challenge. Hot glue or modpodge  was used to adhere the materials to the shallow boxes.  

Wednesday, May 9, 2012

Monoprints

 
Posted by Picasa


These were so fun to do and easy to set up.  We used a pack of transparency sheets (the kind teachers would use for the old projector models).  I demonstrated the process of painting on the transparency, placing a paper on top, burnishing with your palm, and pulling the print.  What's cool is they could explore the printmaking process over and over because they could 'build" their print as they went along.   For example, the first step is to paint your main image, pull print.  Next, paint background, pull print.  Then add details, pull print, etc. Matching the transparency and the white paper was a snap so there was great 
comfort in exploring. 


内
work of Ibrahim Emiko

The inspiration for the project came to me  literally about one hour before class started.  One of my favorite blogs is The Art Room Plant.  Hazel had just published a post on the work of Ibrahim Emiko.
 He works on glass to create what appears to be monoprints.  The site is in Japanese so even if you translate the page, meanings still  get lost in translation.  But as they say, art is a universal language!

Friday, April 27, 2012

Transforming Ink Blots


Predetermined outcome is a closed door. 
Mitzi Scott


Posted by Picasa


Artwork by 3rd and 6th grade students

Second and 3rd grade artwork.


The students loved this project.  I got the inspiration from the Field Elementary Art Blog. They added color which really added a wonderful element.  I've seen these before but it was more or less used for a Halloween lesson on spooky trees.  If you go to Teacher Tube, and search dailymonster.com, you will find videos of Stefan Bucher, the man behind dailymonster.com.  The kids loved watching his time lapse videos of his ink blot drawings.  We did this first and then went to the tables to create our own.  I put ink in a spray bottle and sprayed just a tiny bit on each paper.  The kids used straws to blow a couple of times and then pen or marker to continue the image. Super fun!

Friday, April 20, 2012

Wastebasket Challenge

 
Posted by Picasa


Although people create art for a vast number of  reasons, most artworks belong to one of 3 broad categories: practical, cultural, or personal.   Through these categories we can describe the function of art. The challenge for this project was to design a wastebasket to serve practical, cultural and personal functions.


Result:
This is a wastebasket for a student who has a cold.  You actually put your tissues in it and the stick functions as the tool to push the tissues out when you're ready to dispose of them.  When you are sick you don't want to be getting up to go to the trash can every minute.  With this design you can just put your tissues in it and when it's full you can go dump them out.  Our handle is really light so you can carry it with you.   The cross symbolizes Christianity which all 3 of us are Christians.  What speaks of our culture is the way in which the paint was applied.   It is somewhat transparent and distorted  which is metaphoric for what we experience today.  Our culture is not so easy to see...kind of distorted.


(You can see the video below but unfortunately the sound is not loud enough)

Tuesday, January 24, 2012

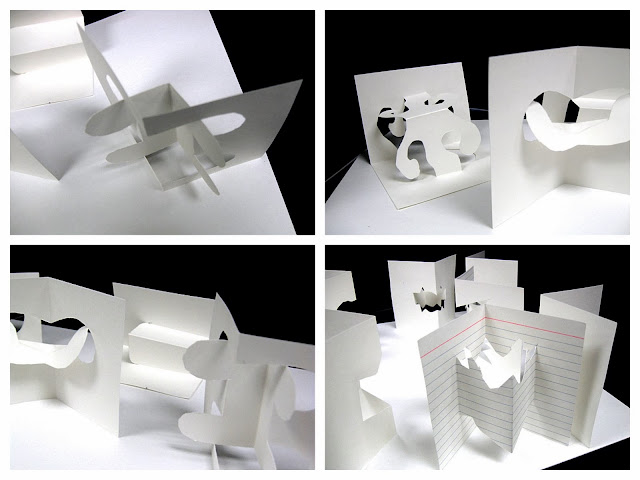
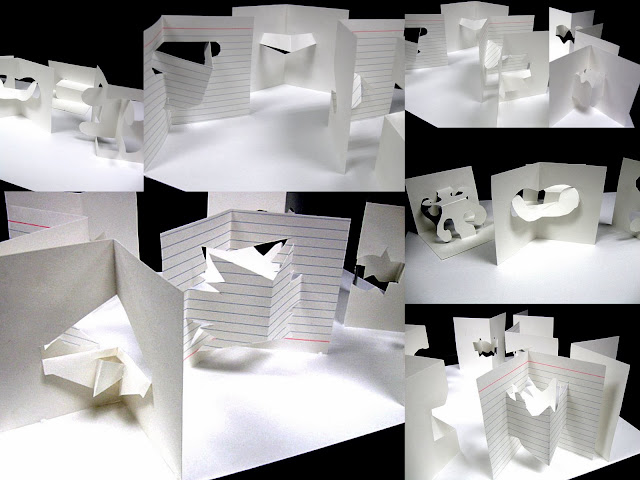
Incised Pop-Ups

Posted by Picasa


Pop -ups have such an enduring fascination.  The techniques we used here are not complex, but the transformation from two dimensions to three almost seems magical.

We used index cards and regular scissors.  First, everyone made all 7 of the pop-ups shown below (just to get the hang of it).  The ones you see above were new designs created by the students.
Fold index card in half vertically or horizontally.  Cut where you see a dash line and crease where you see a solid line.  It's important  to crease in both directions to really "set" the crease. We used the handle of the scissors to smooth the crease.   Open the card and just play with it a bit to get the pop-up.  


Thursday, January 12, 2012

Abstract Crowds


Posted by Picasa

This lesson is about abstraction, simplification of shapes and overlapping.  We first made a few sketches in order to get the shapes super basic or simple.  They could choose any situation in which to place a group of people.  We used liquid watercolors to paint everything in except for the black bands, those were painted with black acrylic to get the opaque contrast quality. Wherever one part of an image overlapped another, that is where the color would change. When they were finished with the painting, they could choose whether they wanted to cut it into strips and reassemble it for even more movement.  Only one student  decided to take this risk which is the single image on top.  If you look at the bottom of the picture you can see how she placed her strips.  To sharpen everything up in the end, we used sharpies to go over the lines.


...And here is a video of the creative process at work!

Wednesday, January 11, 2012

Identity Through Name Design

Posted by Picasa

Identity- How Do The Colors Represent Me?

Jose:
The colors I chose for my Name Design artwork are purple and green.  Green shows that I am natural.  I know this because I don't drink or smoke or do drugs. Plus, my Grandmother had a chart explaining what each color meant.  Purple shows that I am extreme.  I believe this is true because one day I jumped from a roof into a trampoline and I was wearing purple which was ironic.

This is a lesson that's been around awhile but I have tweaked it by adding what I call The Identity Card which I feel adds so much more meaning to the work.  That's what you read above.  I love to see them think about "why" they chose a certain color.  It helps them understand themselves better as artists, gives meaning to their work, and helps them see it in a completely new light.  
Process:

  • Discuss positive and negative space in artwork. 
  • Section your paper into about 14 sections or so and in each section write a letter of your name or a number of the year you were born.  I have them do this lightly so the lines will not show.
  • Color in the negative space in chosen color.
  • Color in the positive space in another color.  
  • (I actually let them vary the colors of positive or negative space so long as I know they understand the concept.)  I also tell them they can choose 1-3 colors.


Friday, January 6, 2012

Handmade Paper


Posted by Picasa

Student: "Why are we going to make paper?"
Me: "I don't understand your question...this is art."
Student: "...but you can just go out and buy paper."
Me:  " (pause) You'll understand why after you make it."
outcome-
...student stays 15 minutes after class is over to continue to make paper!


If you have an opportunity to make paper, whether it's by yourself or with a class, you really should. It's an experience that most kids won't do on their own so they need someone like you to show them how.

Here is a video that I found from eHow that shows you how!


Handmade Paper Pulp Mixing -- powered by ehow

Formal Court Robes

Posted by Picasa


Having an appreciation for other cultures is such a valuable part of who we are.  I believe lessons like this one  
help to bridge the gap of understanding between cultures even if it's just a bit. We looked at Imperial Chinese portraits and thought about the "why's" of everything.  Why are they not smiling?  Why are they almost completely covered?  What might the symbols mean?  By looking and trying to understand we help develop our sense of appreciation of the world and other cultures.
I also did this lesson with some 3rd and 4th grade classes.  To see the process click here.