Showing posts with label video. Show all posts

Wednesday, February 13, 2013

Visible Thinking, Movement and Landscapes

When we are given the opportunity to explore an artwork so much can be gained-  connections are made to self and world, our thinking develops and simply sharing ideas and thoughts show us how to be, how to learn, how to appreciate and share not only the artwork, but one another's thoughts and ideas.

Stuart Davis, Swing Landscape, 1938. Oil on canvas

I wanted the kids to see their thinking today.  As we looked at Stuart Davis' piece, I wrote down their thinking on a large paper.  We used The Explanation Game from the book Making Thinking Visible by Ron Ritchart.  There is a great video below where he talks about this concept, just click on the link.

Class Observations:
I see colors, bright colors, shapes, rectangles, triangles, odd shapes, a ladder, a rope,  patterns...
Conceptual:
I think this is about a city, it looks busy, all the different colors on top of each other make it look busy, the people are missing,  maybe they are hiding from all of the chaos, they're scared, they're in their cars, I think the artist likes this place, it looks fun and crazy, it looks like there is so much movement, I would want to play there, it looks fun,  reminds me of a construction site, I see tall towers and roads and trucks, people use ladders to climb up to where they want to be, the lines make it look jumpy...

Art Project: Create an expressive landscape, seascape or cityscape with patterns and movement.

All artwork by Kinder and First Grade


Ron Ritchheart discussing the importance of thinking

Tuesday, February 5, 2013

Happiness Is... Accordion Books

Happiness Is... singing, me and Mom, chocolate

by Annabelle, 1st grade
A big part of art making is the process of showing your thoughts, ideas or feelings.  This is something we think about at the start of any project.  I wanted each student to capture those joyful moments of childhood in their artwork. Accordion books played into the process beautifully; as your eyes travel through the book you share something new at each moment.

Posted by Picasa


Process:
We used texture plates placed under paper for visual texture (rub with crayon)
cut the paper horizontally (now you have 2)
fold, crease, turn (like a paper fan)
glue the 2 ends together
choose 3-5 things that make you happy, draw them
add a front and back cover (we used card-stock)


This week in art... from Gabriela Elizalde on Vimeo.

Wednesday, December 19, 2012

Plaster Masks

 
Posted by Picasa

We've finished the masks!  They were constructed using plaster gauze, tag/thin cardboard, paint, hot glue and random collage items.
To see the the process click on video below


Plaster Gauze Mask Making from Gabriela Elizalde on Vimeo.

Friday, September 21, 2012

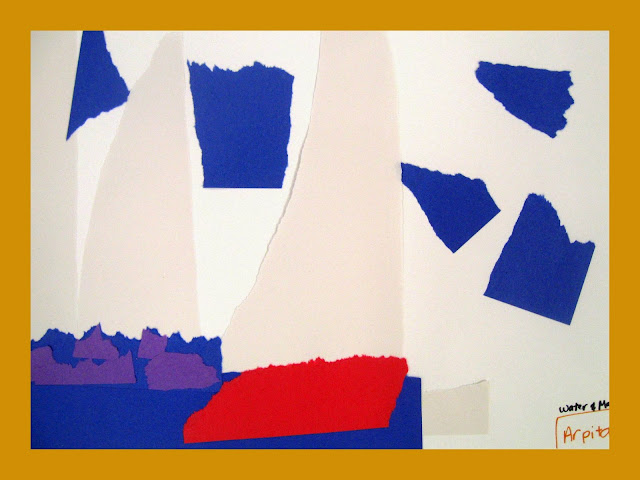
Torn Paper Collage

Ah, tearing, how liberating it feels to tear a brand new sheet of paper straight down the middle. What a sensation- especially  if you're experiencing it for the first time!  That's what Kinder did this week and what a great experience it was.  How charmed we are indeed to be part of those moments!   


Dinosaur
Kinder Student 


Posted by Picasa
Butterfly, Plus Sign and Sky and Butterfly
Kinder Students

Water and Mountains
Kinder Student


Wednesday, May 16, 2012

Styrofoam Explorations

‘If a child is to keep alive his inborn sense of wonder, he needs the companionship of at least one adult who can share it, rediscovering with him the joy, excitement and mystery of the world we live in.’
— Rachel Carson

work in progress, 2nd grade student
Posted by Picasa

These explorations are yet to be finished but the 50% mark (or so?) is so dear that I had to share them.
Each student had a cardboard tray, scissors and a glue stick.  I showed them how to thread a needle. The journey was theirs for the taking.


So today was the day, we were able to finish our styrofoam explorations.  Watching the kids create these was like watching the ocean ebb and flow as there was not a set ending point, it was constant creation.    As one student said,  "I can see myself adding more to this at home and turning it into a huge sculpture."

"I started off making 2 swords but now  I don't know what it is, I've kind of lost myself  while I 'm making it."
                                                           Ian, 2nd grade student


That my friend, is flow.


Friday, April 20, 2012

Wastebasket Challenge

 
Posted by Picasa


Although people create art for a vast number of  reasons, most artworks belong to one of 3 broad categories: practical, cultural, or personal.   Through these categories we can describe the function of art. The challenge for this project was to design a wastebasket to serve practical, cultural and personal functions.


Result:
This is a wastebasket for a student who has a cold.  You actually put your tissues in it and the stick functions as the tool to push the tissues out when you're ready to dispose of them.  When you are sick you don't want to be getting up to go to the trash can every minute.  With this design you can just put your tissues in it and when it's full you can go dump them out.  Our handle is really light so you can carry it with you.   The cross symbolizes Christianity which all 3 of us are Christians.  What speaks of our culture is the way in which the paint was applied.   It is somewhat transparent and distorted  which is metaphoric for what we experience today.  Our culture is not so easy to see...kind of distorted.


(You can see the video below but unfortunately the sound is not loud enough)

Friday, March 30, 2012

Puppet Theater

 
Posted by Picasa


I highly recommend  this project for many grade levels.  The level of engagement was extraordinary from every student.  We started with a simple template  to create a character puppet (see image above). Simply draw your character, fold in half and tape.   We cut a rectangular shape from manila folders and used these for the setting of the story as well as the theater. I had fabric on a table in case anyone wanted to add curtains. Surprisingly, this project only took 2 class periods.  Another great thing was that the kids continued creating stories in their classrooms with their teacher. 

Thursday, January 12, 2012

Abstract Crowds


Posted by Picasa

This lesson is about abstraction, simplification of shapes and overlapping.  We first made a few sketches in order to get the shapes super basic or simple.  They could choose any situation in which to place a group of people.  We used liquid watercolors to paint everything in except for the black bands, those were painted with black acrylic to get the opaque contrast quality. Wherever one part of an image overlapped another, that is where the color would change. When they were finished with the painting, they could choose whether they wanted to cut it into strips and reassemble it for even more movement.  Only one student  decided to take this risk which is the single image on top.  If you look at the bottom of the picture you can see how she placed her strips.  To sharpen everything up in the end, we used sharpies to go over the lines.


...And here is a video of the creative process at work!

Friday, December 16, 2011

Egyptian Canopic Jars

Posted by Picasa


Make your own slide show at Animoto.


We've finally finished the canopic jars.  I want to thank the Museum of Fine Arts here in Houston for the inspiration for this lesson.  The teacher CD  they gave during the educator's night was amazing and provided such wonderful images.
Plastic cups, paper towels, tag or cardboard and tape make up the armature for each jar.  Small pebbles are placed in the bottom cup along with wadded up towels to help  balance the jar and to keep it standing. We then covered them with plaster gauze to make the surface strong and ready for paint.   The rest is up to the imagination of the student.  I did provide handouts of Egyptian symbols and patterns for the students to use as a resource.  These were done by my middle school elective class which was actually perfect because they come to art 4 days in a row.  They took us about 2 weeks to complete.  You can see the steps below.


Thursday, October 27, 2011

Torn Paper Collage

 
Posted by Picasa    Making a torn paper collage is such an engaging  experience for anyone.  The students learned what it means to tear with the grain of the paper and what it means to tear against the grain of the paper.  They  also  arranged their papers in a way that was pleasing to them as artists.  Some chose to make representational collages while others just had fun exploring tearing the paper with a new insight. This lesson really gets a chance to bloom with two class periods versus one.  On the second day,  I demonstrated how you could add details by layering colors on top of other colors.  This really helped them develop their ideas.  Toward the end of class I showed Frederick by Leo Leonni.  With their new found understanding,  they were able to differentiate which shapes were made by tearing and which were made by cutting...pretty cool.  To see all of the collages, click on the slideshow below!


Create your own video slideshow at animoto.com.


Friday, October 21, 2011

Beautiful Owls!

Posted by Picasa

These wonderful clay owls were done by 2nd  graders.  I especially love how they just dove into adding texture with the tools.  Thank you to  That Artist Woman for the inspiration for this lesson!  I did tweak it a bit though.... I  like to put a bunch of tools on the table and let the kids figure out how they can be used to create the texture versus telling what to do with each one. I find it makes them  explore the materials and make new discoveries.
Here are the steps:
(First I demonstrated the process to the whole class)
  1. I gave them a small piece of clay and they rolled it into a ball. 
  2. Then they squished it down with their palms (just enough to flatten it a bit). 
  3. Then they took the rolling pin to make the oval like shape. 
  4. They  folded over the edges to give the shape of the wings. 
  5. For the head you just fold the top down. 
  6. For the ears they  pulled out the clay. 
  7. For the eyes they used  marker tops.
  8. Texture was added with various tools.  
  9. Some of them decided to add a beak with a small bit of clay.

 Voila!


Thursday, October 6, 2011

This Week in Art...

This past week we have been finishing up our colorful castle paintings while learning about color mixing. We are also finishing up printmaking and drawing animals to show texture. To find out more about these lessons scroll down to see the posts.

Friday, September 16, 2011

This Week in Art...

There has been so much going on this week! Kindergarten students have been exploring the potential of crayons (pressure applied, rubbing on side, using the point, etc). First and 2nd graders have been learning about visual texture by drawing animals and trying to show their fur or skin texture. Third graders are learning about the art of paper folding with kirigami and 4th-6th graders have been working on creating symbolic prints... Whew!  Oh, and last but certainly not least,   7th and 8th graders are each creating an altered book!  Scroll down to see pictures of everyone's fabulous art!

Wednesday, June 22, 2011

The Art of Science!

Summer IB Programme


Learn more about the IB Programme

This summer, my school is introducing the IB Programme.    I am working with the kids by creating art (or artful things!) that coincide with  the central idea.  Some of the projects include collage, dioramas of habitats, terrariums, plant models, mobiles, and paintings.  It's been a lot of fun for me because science and art are two of my favorite things! Science is all about looking closer and noticing the little things in life...observing.  Of course we know that artists do that ALL the time... it's just a way of being.   Check out the video to see the joyful learning that's been happening so far!


This Week in Art... from Gabriela Elizalde on Vimeo.

Tuesday, May 31, 2011

Transformation


Create your own video slideshow at animoto.com.

Masks

Transformation
What does it mean?   What can transform? Are humans the only things that can transform?    All of these questions and more were discussed at the beginning of this mask making project.  Students realized transformation goes on all around us (seasons, animals, people) it's just a matter of looking closer.   What fun it was to see personalities come alive through mask making. While some students decided to transform themselves in ways they felt comfortable with others ventured out onto unexplored territory.  Either path, the results were wonderful to see and share.


Create your own video slideshow at animoto.com.


The How To:

  1. Cut poster-board into desired size.
  2. Draw, paint or color mask.
  3. Provide extra poster board to add other elements such as hats, ears, random shapes, etc.
  4. Staple to the main piece. 
  5. Cut a slit leading to each eye then cut around to form the eye shape.
  6. Tape the slits closed on the back of the poster board.
  7. Add a pop-sickle stick to hold mask.
  8. Voila!

Monday, May 9, 2011

Summer School Art Enrichment at Briarmeadow- Art in History


In our summer art program students experience culture, historic time periods and take a piece of history home with them as a reminder of the learning experience.    Through a hands on approach students gain a better understanding of the past through art making. To learn more click Art in History.


Untitled from Gabriela Elizalde on Vimeo.

Friday, April 15, 2011

Word Play!

Word Play and Art Criticism
Art criticism is critical thinking about individual artworks or groups of artworks. With that said, what an enjoyable time we had with Word Play. Noise- Flying- Full- Calm- Mix...Can you interpret a word with a drawing? We did! The challenge was to choose a word and create an artwork based on that word. At the end of class we tried to guess what each others word was by looking closely and describing details in each others artworks. As students learn how to offer interpretations, they also learn how to make judgments about the plausibility of those offered by others. In the end, what they discovered was that even though they had only one word in mind when creating their art, there were actually many possibilities for all of the words to work. Check out the slideshows below to see the results.


Create your own video slideshow at animoto.com.


Create your own video slideshow at animoto.com.


Create your own video slideshow at animoto.com.


Create your own video slideshow at animoto.com.